How I built an AI Text-to-Art Generator
A detailed, step-by-step write-up on how I built Text2Art.com
我如何构建 AI 文本到艺术生成器
关于我如何构建 Text2Art.com 的详细分步说明
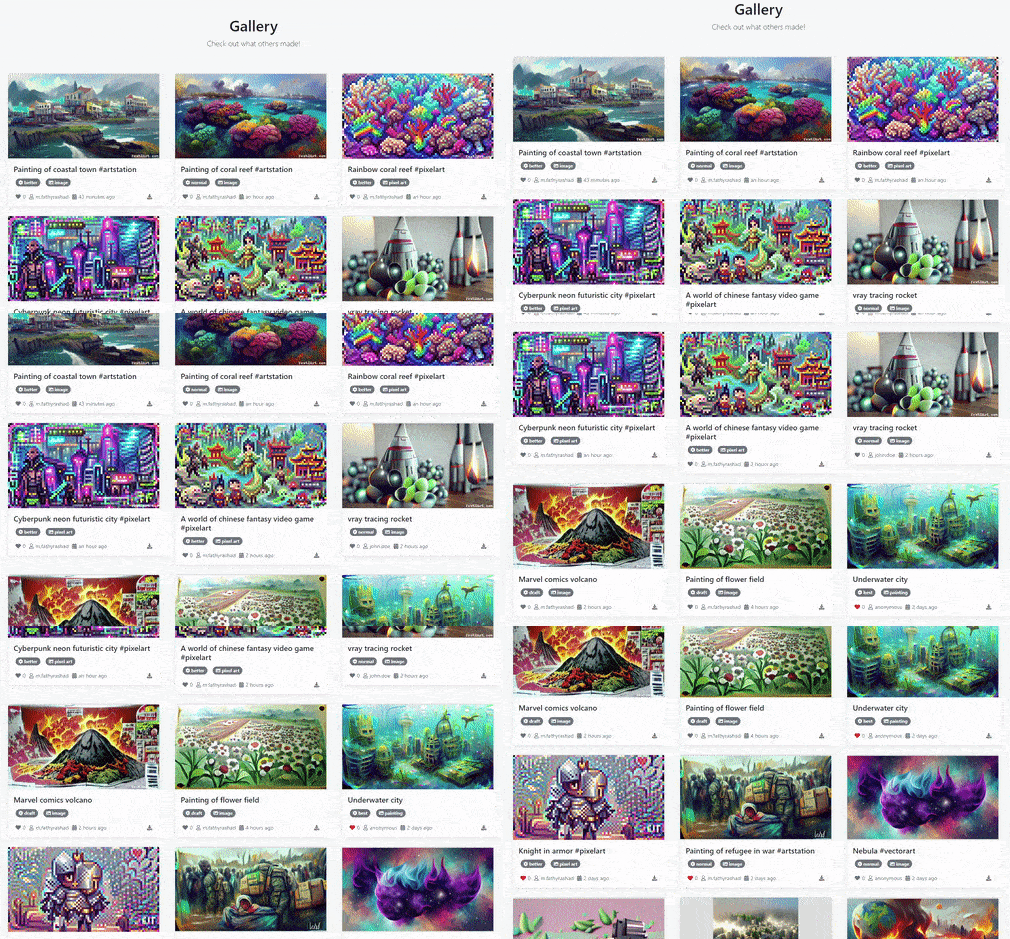
Text2Art Gallery of Generated Arts [Image by Author]# Overview
This article is a write-up on how I built Text2Art.com in a week. Text2Art is an AI-powered art generator based on VQGAN+CLIP that can generate all kinds of art such as pixel art, drawing, and painting from just text input. The article follows my thought process from experimenting with VQGAN+CLIP, building a simple UI with Gradio, switching to FastAPI to serve the models, and finally to using Firebase as a queue system. Feel free to skip to the parts that you are interested in.
You can try it at text2art.com and here is the source code (feel free to star the repo)
这篇文章是关于我如何在一周内建立Text2Art.com的文章。Text2Art 是一个基于 VQGAN+CLIP 的 AI 驱动的艺术生成器,可以仅从文本输入生成像素艺术、绘画和绘画等各种艺术。这篇文章遵循了我的思考过程,从尝试 VQGAN+CLIP、使用 Gradio 构建简单的 UI、切换到 FastAPI 来为模型提供服务,最后到使用 Firebase 作为队列系统。随意跳到您感兴趣的部分。您可以在text2art.com上试用,这里是源代码(请随意为 repo 加注星标)
Text2Art Demo (UPDATE: we have 1.5K+ users now)
Outline
- Introduction
- How It Works
- Generating Art with VQGAN+CLIP with Code
- Making UI with Gradio
- Serving ML with FastAPI
- Queue System with Firebase
- 介绍
- 这个怎么运作
- 使用 VQGAN+CLIP 和代码生成艺术
- 使用 Gradio 制作 UI
- 使用 FastAPI 服务 ML
- Firebase 队列系统
Introduction
Not long ago, generative arts and NFT took the world by storm. This is made possible after OpenAI significant progress in text-to-image generation. Earlier this year, OpenAI announced DALL-E, a powerful text-to-image generator that works extremely well. To illustrate how well DALL-E worked, these are DALL-E generated images with the text prompt of “a professional high quality illustration of a giraffe dragon chimera. a giraffe imitating a dragon. a giraffe made of dragon”.
不久前,生成艺术和 NFT 风靡全球。在 OpenAI 在文本到图像生成方面取得重大进展后,这成为可能。今年早些时候,OpenAI 发布了 DALL-E,这是一款功能强大的文本到图像生成器,运行良好。为了说明 DALL-E 的效果如何,这些是 DALL-E 生成的图像,文字提示为“长颈鹿龙嵌合体的专业高质量插图。模仿龙的长颈鹿。由龙制成的长颈鹿”。
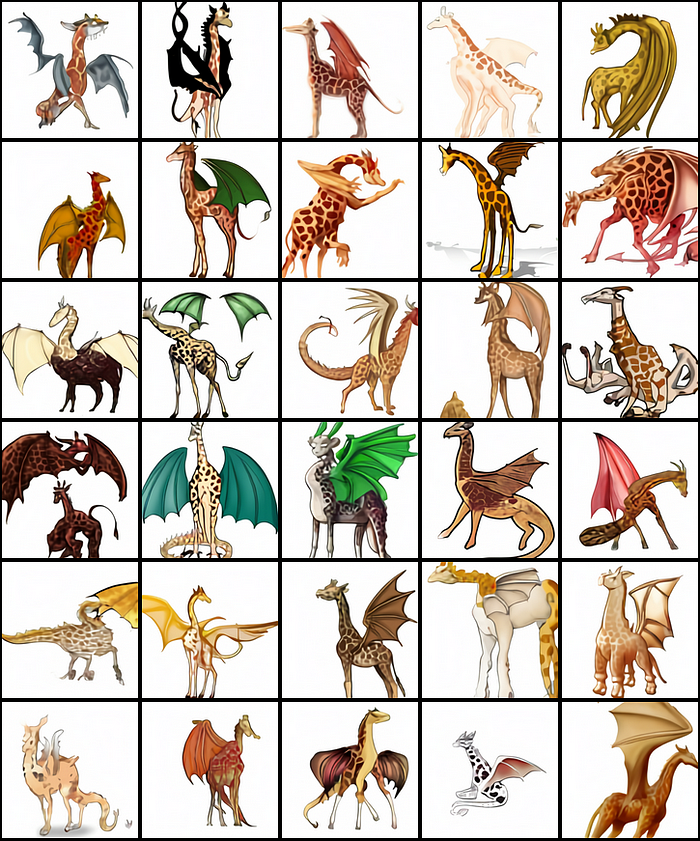
mages produced by DALL-E when given the text prompt “a professional high quality illustration of a giraffe dragon chimera. a giraffe imitating a dragon. a giraffe made of dragon.” [Image by OpenAI with MIT license]
DALL-E 制作的法师在给出文字提示“长颈鹿龙嵌合体的专业高质量插图。模仿龙的长颈鹿。龙做的长颈鹿。” [图片由OpenAI提供,具有 MIT 许可证]
Unfortunately, DALL-E was not released to the public. But luckily, the model behind DALL-E’s magic, CLIP, was published instead. CLIP or Contrastive Image-Language Pretraining is a multimodal network that combines text and images. In short, CLIP is able to score how well an image matched a caption or vice versa. This is extremely useful in steering the generator to produce an image that exactly matches the text input. In DALL-E, CLIP is used to rank the generated images and output the image with the highest score (most similar to text prompt).
不幸的是,DALL-E 没有向公众发布。但幸运的是,DALL-E 的魔力背后的模型CLIP被发布了。CLIP 或对比图像语言预训练是一种结合了文本和图像的多模式网络。简而言之,CLIP 能够对图像与标题的匹配程度进行评分,反之亦然。这对于引导生成器生成与文本输入完全匹配的图像非常有用。在 DALL-E 中,CLIP 用于对生成的图像进行排序,并输出得分最高的图像(最类似于文本提示)。
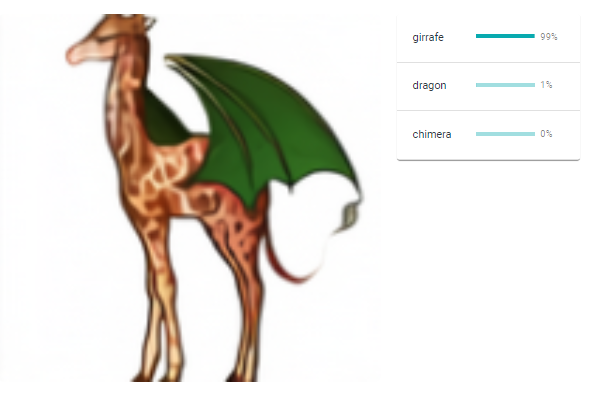
Example of CLIP scoring images and captions [Image by Author]Few months after the announcement of DALL-E, a new transformer image generator called VQGAN (Vector Quantized GAN) was published. Combining VQGAN with CLIP gives a similar quality to DALL-E. Many amazing arts have been created by the community since the pre-trained VQGAN model was made public.
在 DALL-E 发布几个月后,一种名为VQGAN(矢量量化 GAN)的新变压器图像生成器发布了。将 VQGAN 与 CLIP 相结合可提供与 DALL-E 相似的质量。自预训练的 VQGAN 模型公开以来,社区创造了许多令人惊叹的艺术。

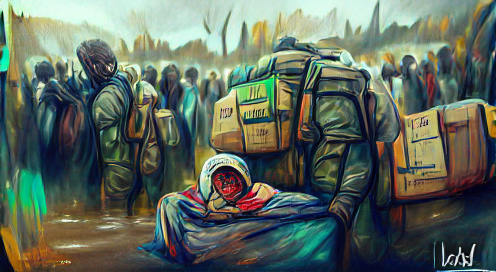
Painting of city harbor night view with many ships, Painting of refugee in war. [Image Generated by Author]
城市港口夜景绘画与许多船只,战争中的难民绘画。[图片由作者生成]
I was really amazed at the results and wanted to share this with my friends. But since not many people are willing to dive into the code to generate the arts, I decided to make Text2Art.com, a website where anyone can simply type a prompt and generate the image they want quickly without seeing any code.
我对结果感到非常惊讶,并想与我的朋友分享。但由于没有多少人愿意深入研究代码来生成艺术,所以我决定制作 Text2Art.com,一个任何人都可以简单地输入提示并快速生成他们想要的图像而无需查看任何代码的网站。
How It Works
So how does VQGAN+CLIP work? In short, the generator will generate an image and the CLIP will measure how well the image matches the image. Then, the generator uses the feedback from the CLIP model to generate more “accurate” images. This iteration will be done many times until the CLIP score becomes high enough and the generated image matches the text.
那么VQGAN+CLIP是如何工作的呢?简而言之,生成器将生成图像,CLIP 将测量图像与图像的匹配程度。然后,生成器使用来自 CLIP 模型的反馈来生成更“准确”的图像。此迭代将进行多次,直到 CLIP 分数变得足够高并且生成的图像与文本匹配。
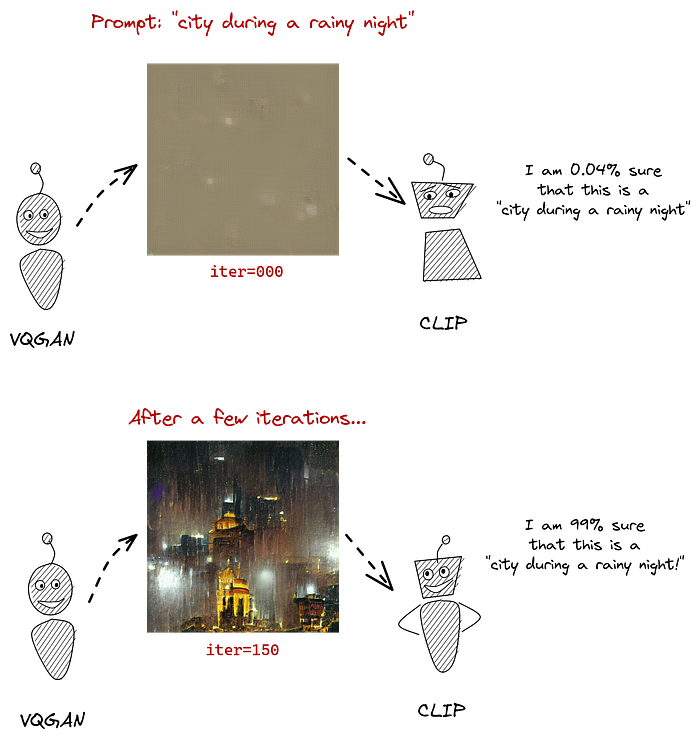
*The VQGAN model generates images while CLIP guides the process. This is done throughout many iterations until the generator learns to produce more “accurate” images. [Source: The Illustrated VQGAN by LJ Miranda]
VQGAN 模型生成图像,而 CLIP 指导该过程。这是在多次迭代中完成的,直到生成器学会生成更“准确”的图像。[来源:LJ Miranda 的插图VQGAN* ]*
I won’t discuss the inner working of VQGAN or CLIP here as it’s not the focus of this article. But if you want a deeper explanation on VQGAN, CLIP, or DALL-E, you can refer to these amazing resources that I found.
我不会在这里讨论 VQGAN 或 CLIP 的内部工作,因为这不是本文的重点。但如果您想更深入地了解 VQGAN、CLIP 或 DALL-E,可以参考我发现的这些惊人资源。
- The Illustrated VQGAN by LJ Miranda: Explanation on VQGAN with great illustrations.
- DALL-E Explained by Charlie Snell: Great DALL-E explanations from the basics
- CLIP Paper Explanation Video by Yannic Kilcher: CLIP paper explanation
- LJ Miranda 的插图 VQGAN:用精美插图解释 VQGAN。
- DALL-E 由 Charlie Snell解释 : 来自基础的伟大 DALL-E 解释
- Yannic Kilcher 的 CLIP 论文解释视频:CLIP 论文解释
X + CLIP
VQGAN+CLIP is simply an example of what combining an image generator with CLIP is able to do. However, you can replace VQGAN with any kind of generator and it can still work really well depending on the generator. Many variants of X + CLIP have come up such as StyleCLIP (StyleGAN + CLIP), CLIPDraw (uses vector art generator), BigGAN + CLIP, and many more. There is even AudioCLIP which uses audio instead of images.
VQGAN+CLIP 只是将图像生成器与 CLIP 相结合的一个例子。但是,您可以用任何类型的生成器替换 VQGAN,它仍然可以很好地工作,具体取决于生成器。X + CLIP 的许多变体已经出现,例如StyleCLIP(StyleGAN + CLIP)、CLIPDraw(使用矢量艺术生成器)、BigGAN + CLIP 等等。甚至还有使用音频而不是图像的AudioCLIP 。
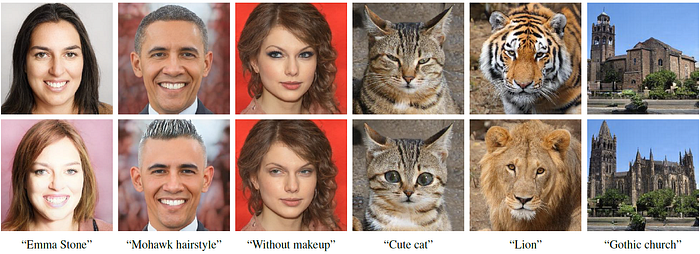
Image editing with StyleCLIP [Source: StyleCLIP Paper]# Generating Art with VQGAN+CLIP with Code
I’ve been using the code from clipit repository by dribnet which made generating art using VQGAN+CLIP into a simple few lines of code only (UPDATE: clipit has been migrated to pixray).
It is recommended to run this on Google Colab as VQGAN+CLIP requires quite a lot GPU memory. Here is a Colab notebook that you can follow along.
First of all, if you are running on Colab, make sure you change the runtime type to use GPU.
我一直在使用来自dribnet的 clipit 存储库中的代码,这使得使用 VQGAN+CLIP 生成艺术只需几行简单的代码(更新:clipit已迁移到pixray)。
建议在 Google Colab 上运行它,因为 VQGAN+CLIP 需要相当多的 GPU 内存。这是一个Colab 笔记本,您可以按照它进行操作。
首先,如果您在 Colab 上运行,请确保将运行时类型更改为使用 GPU。
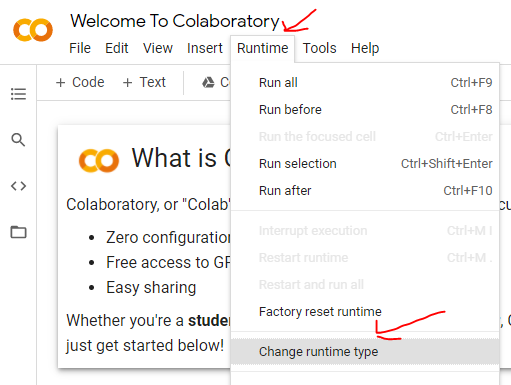
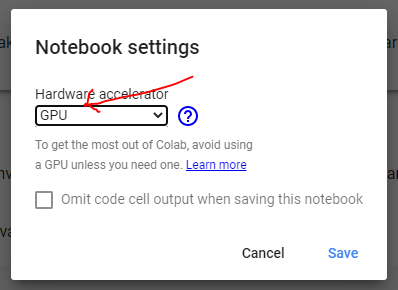 Steps to change Colab runtime type to GPU. [Image by Author]
Next, we need to set up the codebase and the dependencies first.
接下来,我们需要先设置代码库和依赖项。
from IPython.utils import io
with io.capture_output() as captured:
  !git clone https://github.com/openai/CLIP
  # !pip install taming-transformers
  !git clone https://github.com/CompVis/taming-transformers.git
  !rm -Rf clipit
  !git clone https://github.com/mfrashad/clipit.git
  !pip install ftfy regex tqdm omegaconf pytorch-lightning
  !pip install kornia
  !pip install imageio-ffmpeg
  !pip install einops
  !pip install torch-optimizer
  !pip install easydict
  !pip install braceexpand
  !pip install git+https://github.com/pvigier/perlin-numpy

  # ClipDraw deps
  !pip install svgwrite
  !pip install svgpathtools
  !pip install cssutils
  !pip install numba
  !pip install torch-tools
  !pip install visdom

  !pip install gradio

  !git clone https://github.com/BachiLi/diffvg
  %cd diffvg
  # !ls
  !git submodule update --init --recursive
  !python setup.py install
  %cd ..

  !mkdir -p steps
  !mkdir -p models
(NOTE: “!” is a special command in google Colab that means it will run the command in bash instead of python”)
Once we installed the libraries, we can just import clipit and run these few lines of code to generate your art with VQGAN+CLIP. Simply change the text prompt with whatever you want. Additionally, you can also give clipit options such as how many iterations, width, height, generator model, whether you want to generate video or not, and many more. You can read the source code for more information on the available options.
(注意:“!”是 google Colab 中的一个特殊命令,这意味着它将在 bash 而不是 python 中运行该命令”)
一旦我们安装了这些库,我们就可以导入clipit并运行这几行代码来使用 VQGAN+CLIP 生成您的艺术作品。只需使用您想要的任何内容更改文本提示。此外,您还可以提供clipit诸如迭代次数、宽度、高度、生成器模型、是否要生成视频等选项。您可以阅读源代码以获取有关可用选项的更多信息。
Code for generating art with VQGAN+CLIPOnce you run the code, it will generate an image. For each iteration, the generated image will be closer to the text prompt.
import sys
sys.path.append("clipit")
import clipit

# To reset settings to default
clipit.reset_settings()

# You can use "|" to separate multiple prompts
prompts = "underwater city"

# You can trade off speed for quality: draft, normal, better, best
quality = "normal"

# Aspect ratio: widescreen, square
aspect = "widescreen"

# Add settings
clipit.add_settings(prompts=prompts, quality=quality, aspect=aspect)

# Apply these settings and run
settings = clipit.apply_settings()
clipit.do_init(settings)
cliptit.do_run(settings)

Result improvement based on longer iterations for “underwater city”. [Image by Author]## Longer Iterations
运行代码后,它将生成图像。对于每次迭代,生成的图像都会更接近文本提示。
If you want to generate with a longer iteration, simply use the iterations option and set it as long as you want. For example, if you want to it to run for 500 iterations.
如果您想生成更长的迭代,只需使用该iterations选项并根据需要设置它。例如,如果您希望它运行 500 次迭代。
clipit.add_settings(iterations=500)
Generating Video
Since we need to generate the image for each iteration anyway, we can save these images and create an animation on how the AI generates the image. To do this, you can simply add the make_video=True before applying the settings.
由于无论如何我们都需要为每次迭代生成图像,我们可以保存这些图像并创建关于 AI 如何生成图像的动画。为此,您只需make_video=True在应用设置之前添加。
clipit.add_settings(make_video=True)
It will generate the following video.
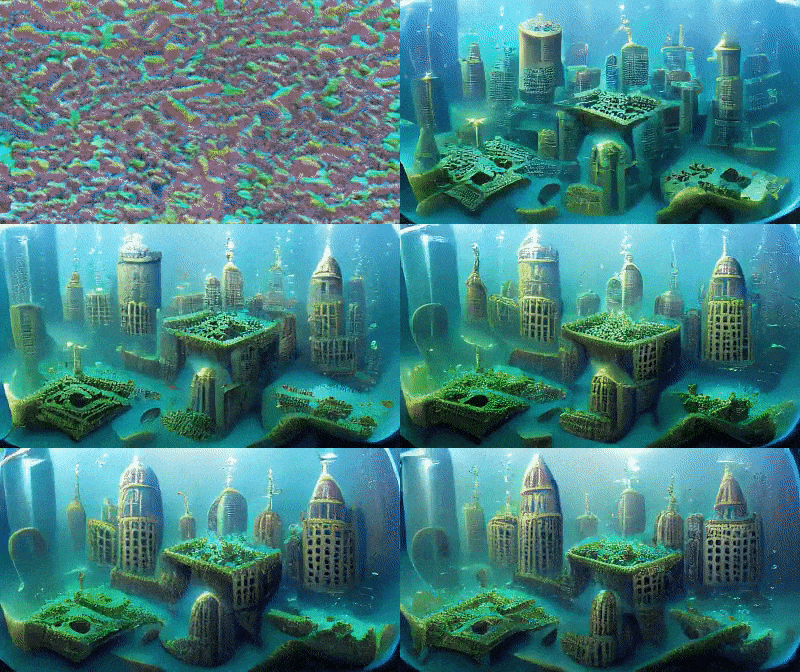
Generated “Underwater City” GIF [Image by Author]## Customizing Image Size
You can also modify the image by adding the size=(width, height)option. For example, we will generate a banner image with 800x200 resolution. Note that higher resolution will require higher GPU memory.
您还可以通过添加size=(width, height)选项来修改图像。例如,我们将生成一个分辨率为 800x200 的横幅图像。请注意,更高的分辨率将需要更高的 GPU 内存。
clipit.add_settings(size=(800, 200))

Generated 800x200 image with the prompt “Fantasy Kingdom #artstation” [ Image by Author]## Generating Pixel Arts
There is also an option to generate pixel art in clipit. It uses the CLIPDraw renderer behind the scene with some engineering to force pixel art style such as limiting palette colors, pixelization, etc. To use the pixel art option, simply enable the use_pixeldraw=True option.
还有一个选项可以在 clipit 中生成像素艺术。它在幕后使用 CLIPDraw 渲染器和一些工程来强制像素艺术风格,例如限制调色板颜色、像素化等。要使用像素艺术选项,只需启用该use_pixeldraw=True选项。
clipit.add_settings(use_pixeldraw=True)

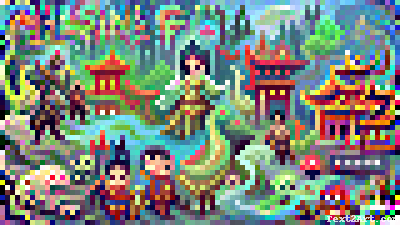 Generated image with the prompt “Knight in armor #pixelart” (left) and “A world of chinese fantasy video game #pixelart” (right) [Image by Author]
VQGAN+CLIP Keywords Modifier
Due to the bias in CLIP, adding certain keywords to the prompt may give a certain effect to the generated image. For example, adding “unreal engine” to the text prompt tends to generate a realistic or HD style. Adding certain site names such as “deviantart”, “artstation” or “flickr” usually makes the results more aesthetic. My favorite is to use “artstation” keyword as I find it generates the best art.
由于 CLIP 中的偏差,在提示中添加某些关键字可能会对生成的图像产生一定的影响。比如在文字提示中加入“虚幻引擎”,往往会产生逼真或高清的风格。添加某些站点名称,例如“deviantart”、“artstation”或“flickr”通常会使结果更美观。我最喜欢的是使用“artstation”关键字,因为我发现它可以产生最好的艺术。
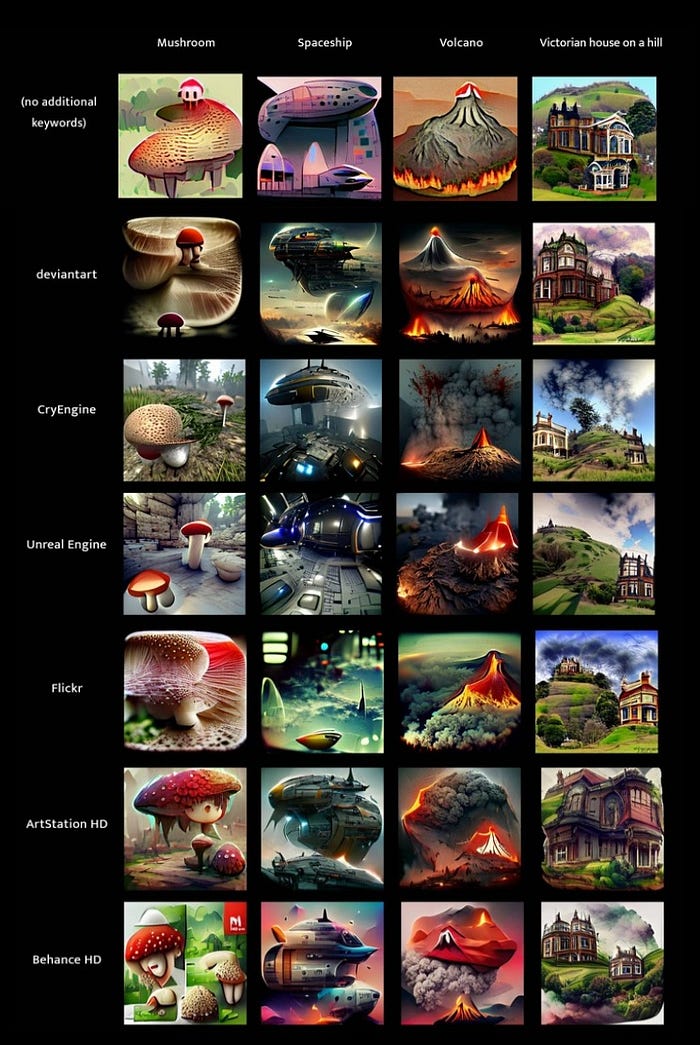
Keywords comparison [Image by kingdomakrillic]Additionally, you can also use keywords to condition the art style. For example, the keywords “pencil sketch”, “low poly” or even artist’s name such as “Thomas Kinkade” or “James Gurney”.
此外,您还可以使用关键字来调节艺术风格。例如,关键字“铅笔素描”、“低聚”甚至艺术家的名字,如“Thomas Kinkade”或“James Gurney”。

Artstyle Keyword Comparison. [Image by kingdomakrillic]To explore more on the effect of various keywords, you can check out the full experiment results by kingdomakrillic which shows 200+ keywords results using the same 4 subjects.
要深入了解各种关键字的效果,您可以查看Kingdomakrillic 的完整实验结果,其中显示了使用相同 4 个主题的 200 多个关键字结果。
Building UI with Gradio
My first plan on deploying an ML model is to use Gradio. Gradio is a python library that simplifies building ML demos into a few lines of code only. With Gradio, you can build a demo in less than 10 minutes. Additionally, you can run the Gradio in Colab and it will generate a sharable link using Gradio domain. You can instantly share this link with your friends or the public to let them try out your demo. Gradio still has some limitations but I find it’s the most suitable library to use when you just want to demonstrate a single function.
我部署 ML 模型的第一个计划是使用Gradio。Gradio 是一个 Python 库,可将 ML 演示简化为几行代码。使用 Gradio,您可以在 10 分钟内构建一个演示。此外,您可以在 Colab 中运行 Gradio,它将使用 Gradio 域生成一个可共享的链接。您可以立即与您的朋友或公众分享此链接,让他们试用您的演示。Gradio 仍然有一些限制,但我发现它是您只想演示单个功能时使用的最合适的库。
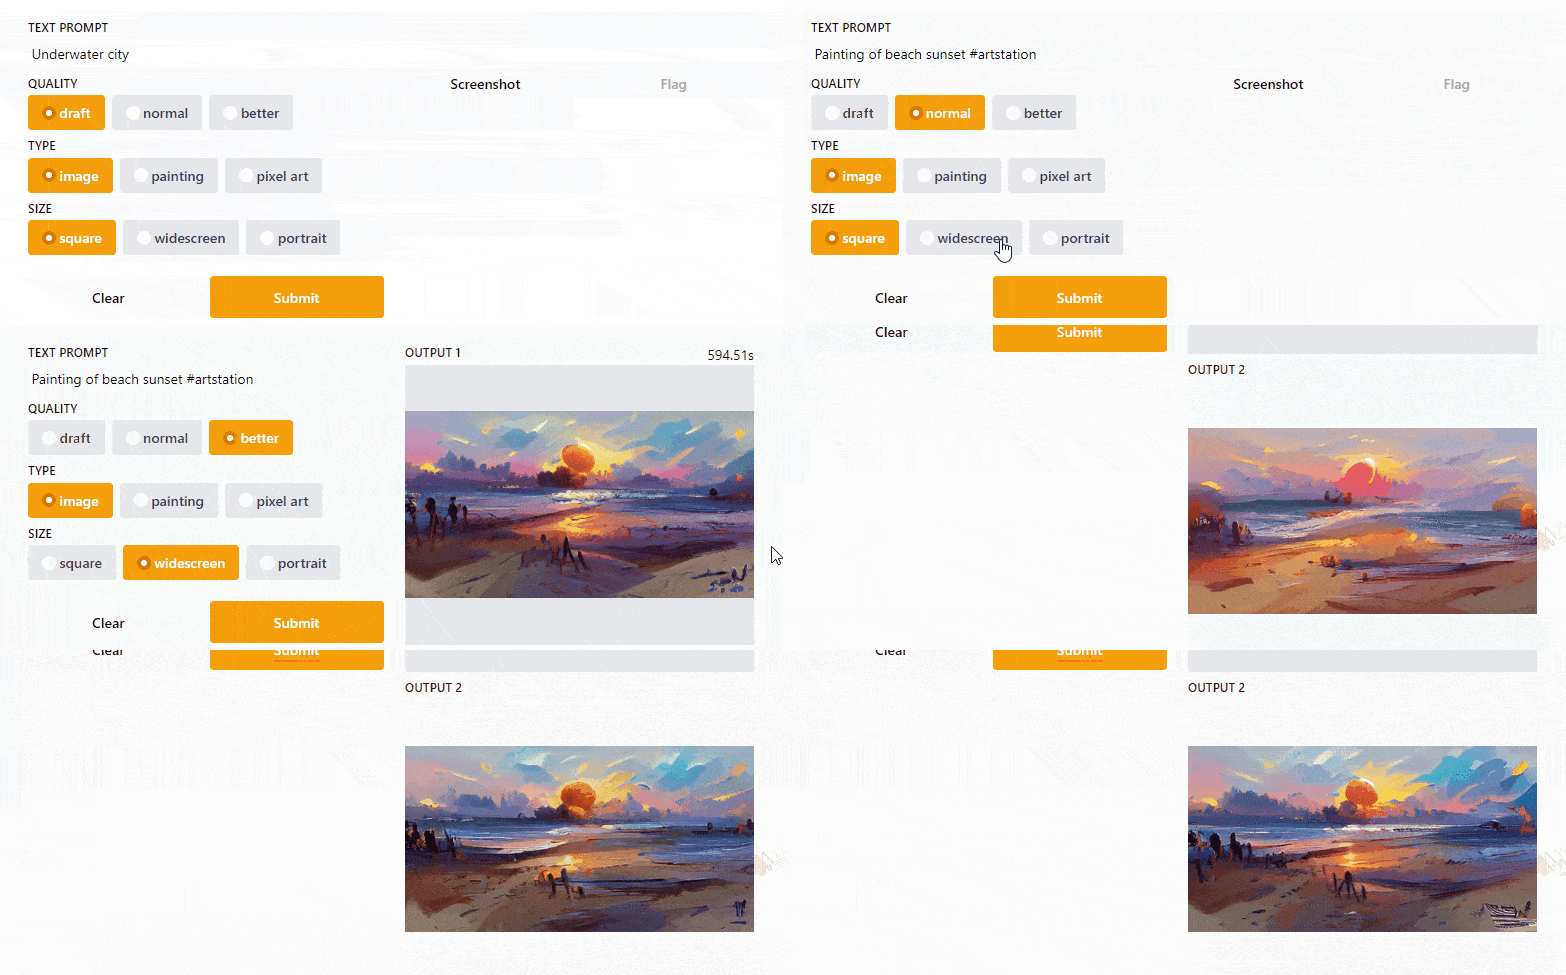
Gradio UI [Image by Author]So here is the code that I wrote to build a simple UI for the Text2Art app. I think the code is quite self-explanatory, but if you need more explanation, you can read the Gradio documentation.
下面是我为 Text2Art 应用程序构建一个简单 UI 而编写的代码。我认为代码是不言自明的,但是如果您需要更多解释,可以阅读Gradio 文档。
import gradio as gr
import torch
import clipit

# Define the main function
def generate(prompt, quality, style, aspect):
    torch.cuda.empty_cache()
    clipit.reset_settings()

    use_pixeldraw = (style == 'pixel art')
    use_clipdraw = (style == 'painting')
    clipit.add_settings(prompts=prompt,
                        aspect=aspect,
                        quality=quality,
                        use_pixeldraw=use_pixeldraw,
                        use_clipdraw=use_clipdraw,
                        make_video=True)

    settings = clipit.apply_settings()
    clipit.do_init(settings)
    clipit.do_run(settings)

    return 'output.png', 'output.mp4'

# Create the UI
prompt = gr.inputs.Textbox(default="Underwater city", label="Text Prompt")
quality = gr.inputs.Radio(choices=['draft', 'normal', 'better'], label="Quality")
style = gr.inputs.Radio(choices=['image', 'painting','pixel art'], label="Type")
aspect = gr.inputs.Radio(choices=['square', 'widescreen','portrait'], label="Size")
Code to build the Gradio UIOnce you run this in Google Colab or local, it will generate a shareable link that makes your demo accessible public. I find this extremely useful as I don’t need to use SSH tunneling like Ngrok on my own to share my demo. Additionally, Gradio also offers a hosting servi
